One helpful feature on your Windows PC is the ability to take screenshots. Record-keeping and sharing the screen with others can both benefit from it. Additionally, you can utilise it to mark any bugs or software errors you’ve encountered.
You can utilise more than simply the Print Screen key while taking screenshots on a computer or laptop.
Method1:
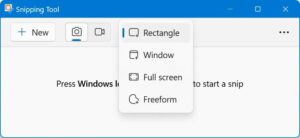
One of Microsoft Windows’ built-in apps is the Snipping tool. It enables you to draw a partial or full image of the screen of your HP PC.
To use the snipping tool to take and save a screenshot, follow these steps:
Step 1: Start the snipping too
Click “Start” and enter “snipping tool.”
Select the Snipping Tool application.
Step 2: The screen that follows will appear.
To take a screenshot, click “New.”
Tips for Taking a Screenshot
Step 3: Choose the section of the screen that needs to be grabbed.
The snipping tool will show the chosen area as follows:
Methods for Taking Screenshots
Step 4: Save the screenshot.
Ctrl + S can be used to save screenshots that have been taken.
The following actions can also be taken to accomplish this:
Select the “File” menu.
Select “Save As.”
Methods for Taking Screenshots
Step 5: Select the location where the snapshot will be saved.
Decide where to store the screenshot.
Press the “Save” button.
Method 2:
Windows full screen
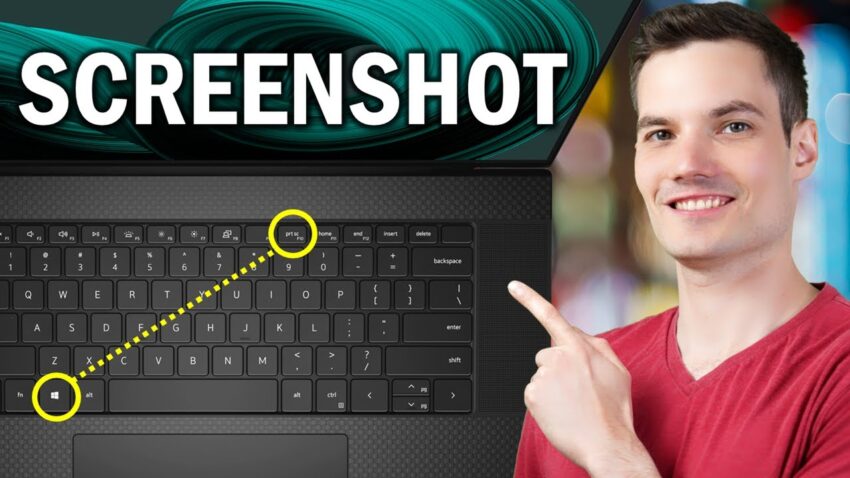
On each PC, press either “Print Screen/PrtScrn” or “Alt” and “Print Screen/PrtScrn.”
Press “Start.”
Click “Paint.” If you are unable to locate it, search for “Paint.”
Press “File.”
To launch a new page, click “New.”
On the new page, click “Paste.”
Select “File.”
Select “Save As.”
Click “Save” after giving the new file a name and selecting its location on your computer.
Method 3:
This is a fast way to capture a screenshot of the window that is now open. All you need to do is press the Alt+ PrtScn key on your keyboard. By doing this, the window that is presently open will be snapped and copied to the clipboard. The snapshot must now be pasted into an image editor and saved.